Contents
Intro
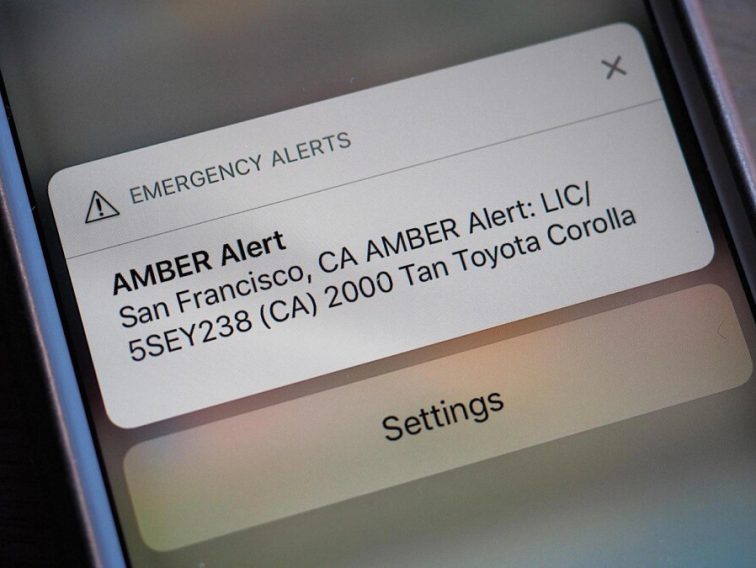
When it comes to staying safe, knowing how to receive AMBER alerts on iPhone is super important. Honestly, no one wants to miss out on critical information that could potentially save lives. So, let’s dive into the nitty-gritty of customizing those emergency alerts. In this guide, I’ll walk you through the steps to access these settings and get AMBER alerts set up on your iPhone. Let’s go!
Customizing Emergency Alerts on iPhones
So, first things first—what exactly are emergency alerts? These notifications are designed to keep us informed about severe weather, public safety issues, and yes, AMBER alerts. In this section, I’m going to break down exactly how you can customize your iPhone settings to make sure you’re always in-the-know.
Steps to Access Customization Settings
1. Unlock your iPhone—The first step is super simple. Just grab your device and swipe it open!
2. Open Settings—Locate that little gear icon and tap on it.
3. Navigate to Notifications—Scroll down until you see “Notifications.” Click it.
4. Emergency Alerts—Now, scroll all the way down to find “Government Alerts.” Here’s where the magic happens.
As you can see, customizing your iPhone is a breeze. But remember, the process can vary a bit depending on your iOS version, so make sure you’re running the latest update to get all the features!
Differences Between iOS and Android Customization
While iPhones have their unique way of handling alerts, Android devices have their method too. On an Android phone, the menu for receiving AMBER alerts is usually within Settings > Apps & Notifications > Advanced > Privacy > Emergency Alerts. It’s simply a matter of preference. I personally prefer the streamlined layout of iOS.
Recommendations for Managing Alerts
Customize your settings based on your lifestyle. If you live in an area prone to severe weather, keeping those alerts on is a no-brainer. Try to silence other less critical notifications, so you don’t get overwhelmed. You don’t want to ignore critical alerts just because of a barrage of notifications.
Emergency Alerts on iPhone
Now that you’ve got the basics down, let’s dig deeper into those emergency alerts on iPhone. Apple makes it easier for users to receive AMBER alerts and other government notifications by simply toggling a few switches.
Overview of “Government Alerts” Feature
The Government Alerts feature on iPhones allows you to receive AMBER alerts, alerts for severe weather, and other public safety messages. If you’ve never had an AMBER alert come through, consider yourself lucky. But, with a little customization, you can easily prepare for it.
Setting Emergency Alerts in Notifications
To manage your emergency alerts, here’s how to set everything up in your notifications:
1. Navigate to Settings—You already know how to do this from earlier, right?
2. Click on Notifications—Tap that section again.
3. Find Government Alerts—Scroll down until you see the toggle options for Government Alerts—this is the goldmine.
Each alert type has its toggle, so you can easily turn AMBER alerts on or off based on your preferences.
Types of Alerts
What types of alerts can you expect? Here are the main ones:
– Severe weather alerts: Be prepared for unexpected storms.
– AMBER alerts: Stay informed about child abductions.
– Public safety alerts: Get notified about local emergencies.
You can customize how you receive these alerts. You can decide to receive sounds, vibrations, or visual alerts. For many users, keeping these notifications loud and clear is the way to go. No one wants to miss an important message!
Comprehensive Guide to iPhone Notifications
Beyond emergency alerts, understanding how to manage your general notifications can enhance your overall iPhone experience. The more you know about your notifications, the better you can customize them to fit your needs.
Accessing the Notifications Section in Settings
As mentioned earlier, accessing notifications is super intuitive. Just go back to Settings > Notifications. From here, you can customize notifications for all your apps, including how they show up on your lock screen.
Customization Options for App Notifications
Did you know you can choose different styles for notifications? You can set it to show banners, pop-ups, or even have them appear as a “badge” on the app icon. I like to keep my notifications neat, so I usually just have banners.
Importance of Settings Management for User Experience
Effective notification management can really streamline your day-to-day life. Consider how you want to prioritize alerts and tweak your settings as needed. This way, you won’t miss out on important stuff, and you won’t get bogged down with unnecessary notifications.
Conclusion
Staying informed is crucial, especially when it comes to safety. By now, you should have a solid grasp on how to receive AMBER alerts on iPhone, and I encourage you to take a minute to check your settings. Don’t forget, I’d love your feedback! Share your thoughts, ask questions, or explore more on our website: Iphone7price.org.


