Intro
Hey there! If you’re wondering how to set 1 inch margins in Word, you’ve landed in the right spot! I’m Nicole, and I’m here to help you change those margins like a pro. Setting the right margins is essential for making your documents not just look good but also read well. So, whether you’re writing a report for school or crafting a resume, adjusting your document margins is key. Let’s dive into how you can easily change margins in Word and take your document to the next level!
Changing Margins in Word

Accessing the Margin Settings
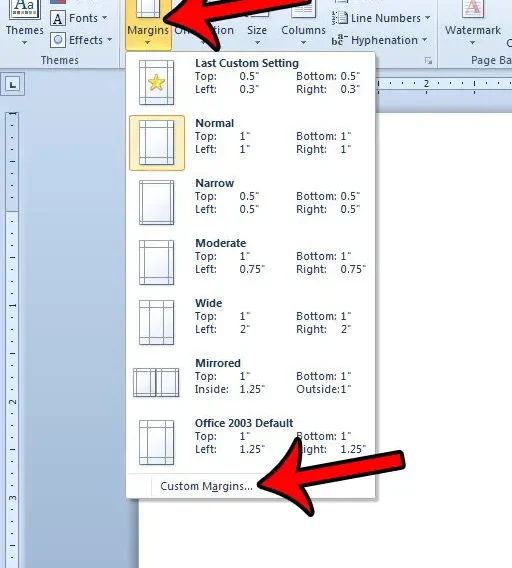
First off, finding where to set those margins is super easy. Just open your Microsoft Word document, and look for the Layout or Page Layout tab in the Ribbon. Yup, it’s that simple! Once you’re there, click on the “Margins” option.
You’ll see a menu pop up. Here, you can opt for preset margin choices like Normal, Narrow, or Wide. Personally, I usually stick with Normal for most documents, but let’s be real; if I need something custom, I’ll go for that option available at the bottom of the menu.
Choosing Margin Options
Now, when you select “Custom Margins,” you can fine-tune your margins to exactly 1 inch or whatever size fits your needs. Here’s how it works:
1. Top Margin: Set it to 1 inch (0.5 normal is too tight for me).
2. Bottom Margin: Also 1 inch—this keeps things balanced, right?
3. Left Margin: Yep, 1 inch here too.
4. Right Margin: You guessed it, 1 inch.
This layout is perfect for most writing projects! It’s like having a solid framework for your document.
Margin Adjustments

Steps for Adjusting Margins
Once you’ve nailed how to access the margins, making adjustments is where it gets even more fun. If you want to set some specific measurements, just type in whatever size you like. Remember, tight margins can make your text feel crowded, especially when reading. So, I always say aim for that 1 inch to keep things looking clean.
If you’re working on a report with various sections, Microsoft Word is super friendly. You can adjust margins for different sections, allowing for some creativity in your document layout. For instance, if you want a wider margin for a title page, it’s as easy as clicking on the section break. Just remember to adjust your margins afterward.
Adjusting Margins for Sections
Speaking of sections, let’s take a look at how to manage margins when you have multiple segments in your document. Imagine you start with one layout for the introduction but want a different look for your main content. All you have to do is use section breaks!
When you create a new section, the margin settings will remain the same until you tell Word to change them. You’ll do this by following the same steps mentioned earlier and simply adjusting the dimensions for that specific section.
With all these options, you can create a polished document that flows smoothly and looks professional.
Further Guidance on Margins

Role of Margins in Document Readability
Margins are essential because they not only set the boundaries of your text but also influence how we read. That’s right—the margin size affects the readability of your entire document. Wider margins may give a more airy feel, whereas narrower margins can make the text feel cramped.
It’s like this: if you have a bunch of text all piled up with no space around it, it’s just overwhelming! We want our readers to enjoy the experience, y’know? I always try to think about the user experience when I’m writing.
Using the Ruler for Margin Adjustments
Another cool way to set margins is by using the ruler in Word. If the ruler is not already visible, you can easily enable it from the View menu. This feature lets you adjust your margin visually! Leaning towards a more hands-on approach not only makes it intuitive, but it’s also pretty satisfying to see those lines move as you drag.
So, if you’re the sort of person who likes things to be precise, you’ll love the control the ruler gives you. It’s like drawing a perfect line for the ultimate document layout.
Importance of Margins for Annotations and Binding
Lastly, let’s not forget about annotations. If you’re planning to share your document or print it out, those margins come in handy for notes or comments. Annotations not only add value to your work but also show others what you’re thinking.
Plus, if you’re printing and binding your work (like for a project), having those extra margins ensures there’s room for any holes needed for binding. It’s all about thinking ahead, peeps!
Conclusion
So there you have it! Now you know how to set 1 inch margins in Word, along with the importance and techniques for doing it effectively. If you found this information helpful or have any more questions, feel free to drop a comment below. And don’t forget to check out more content at Iphone7price.org for all your Apple product needs!