Contents
Intro
So, you’ve got a shiny new Apple device, and now you’re wondering how to deauthorize computers in iTunes? No worries! I got your back. Whether you’re moving on from an old laptop or just want to tidy up your account, deauthorizing a computer is key. In this guide, I’ll walk you through both authorizing and deauthorizing your computers, explain the limits Apple places on this process, and even share some troubleshooting tips. Let’s dive right in!
Authorizing a Computer
First things first, let’s chat about authorizing a computer. This is pretty essential if you want to access your purchased music and media through iTunes or Apple Music. Here’s how you do it:
1. Open the app: Launch iTunes or Apple Music on your computer.
2. Sign In: Use your Apple ID to log in. If you’ve forgotten your credentials, don’t panic! You can easily reset your password.
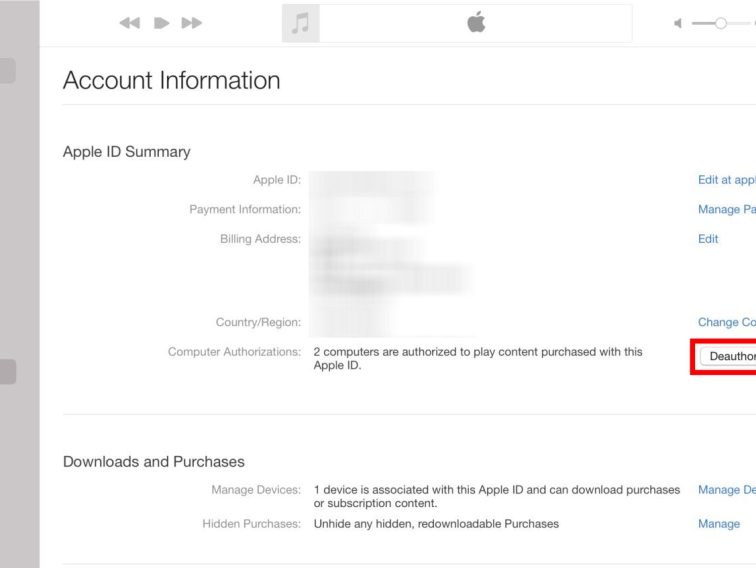
3. Go to the Account Menu: Click on the account menu at the top. It’s like the secret door to your Apple world.
4. Authorize This Computer: Select Account > Authorizations > Authorize This Computer.
5. Confirm Your Action: You’ll need to enter your Apple ID and password just to make sure it’s really you.
Pretty straightforward, right? By authorizing, you’re telling Apple, “Hey, I trust this device with my media!” Just remember, you can authorize up to five computers at once.
Now that we’ve got the authorization down, let’s flip the script and talk about deauthorizing a computer. Whether you’re selling an old device or just don’t use it anymore, here’s how you can easily remove its access:
1. Launch the App: Just like before, open iTunes or Apple Music.
2. Sign In: Yup, you’ve got to log in again!
3. Access Account Menu: Navigate to Account > Authorizations once more.
4. Select Deauthorize This Computer: You’ll see this option right here. Click on it!
5. Enter Details: Just confirm your action by entering your Apple ID and password.
And just like that, the computer is deauthorized! This keeps your account clean and minimizes the risk of anyone accessing your purchased content without your permission.
Authorization Limits
Okay, quick reality check. Apple sets limits on how many devices can be authorized. You’re allowed up to five computers using the same Apple ID. If you hit that limit, don’t sweat it; you have options. You could deauthorize other computers that you no longer use or even go for the “Deauthorize All” option if you’re feeling adventurous (but use it wisely—it’s limited to once a year!). Knowing this keeps your account neat and allows better management of your devices.
Troubleshooting Common Issues
Sometimes, things just don’t go as planned. If you encounter issues while trying to authorize or deauthorize your computer, here are some quick fixes:
– Check Your Apple ID: Ensure you are signed in with the correct Apple ID. It’s easy to forget which one you used!
– Internet Connection: Make sure your device is connected to the internet. Authorization needs a solid connection.
– Software Updates: Check for software updates. Sometimes, an outdated iTunes or Apple Music app can cause hiccups.
If these steps don’t work, don’t hesitate to reach out to Apple Support for guidance.
Community Insights and Recommendations
To spice things up, let’s take a peek at what real users are saying about the deauthorization process. Many of us have faced challenges when managing our authorized devices. It’s not uncommon to feel a little lost.
Users have shared their experiences, saying:
> “I had no idea how many devices were authorized with my Apple ID until I hit my limit!”
Others recommend keeping a list of devices you authorize to avoid hitting that five-device cap. Tracking your devices helps you stay organized and simplifies troubleshooting later on.
Conclusion
And that’s a wrap! If you’ve found my guide helpful, I’d love to hear your thoughts. Feel free to drop a comment or share your experiences! Don’t forget to check out more awesome content on our website Iphone7price.org for everything Apple!